
The fastest way to put eleven holes in a wall is to start nailing before you’ve planned. I’ve watched it happen on jobsites and in my own living room: you eyeball the first frame, hang the second to match, and by the fifth one the whole thing is creeping uphill. So here’s how to hang a gallery wall the way that avoids all that — floor mockup, paper templates, hardware math, and the order you drive the nails in. Pros measure; beginners guess. The measuring isn’t hard, it just comes first.
TL;DR
- Plan and hang in two sessions: floor mockup and paper templates first, then nails. Budget roughly 1–2 hours to lay it out and 1.5–2.5 hours to hang.
- Trace each frame onto kraft paper, mark the nail point off the back hardware, tape templates up with painter’s tape (never masking tape), and keep frames 2–3 inches apart.
- Hang the hero piece first at a 57-inch visual centre and work outward; choose hardware by weight — adhesive strips or picture hooks under 20 lb, a stud or toggle bolt over 20 lb.
What It Takes to Hang a Gallery Wall: Time, Tools, and One Rule About the Floor
Here’s the part most guides skip: what it costs in time, what you need on the bench, and the rule that decides whether you patch one hole or eight. For the design thinking behind the wall, see planning a living room gallery wall from scratch — this article is the execution.
Honest time estimate: two evenings, not one afternoon
I’ll be straight about the clock, because every “quick gallery wall” video I’ve watched lied to me. Once a layout is planned, the hanging is fast — about an hour for a nine-frame grid, up to 2.5 hours for a mixed arrangement. But that doesn’t include the planning, which is where the time goes; Lowe’s tells people to budget “a few hours” total. What I’d plan for is two sessions — mockup and templates one evening, hang the next. I can’t point you to a study that proves two evenings beats one; it’s just what keeps working, because fresh eyes catch a bounding box riding too high.
The short tool list — nothing exotic required
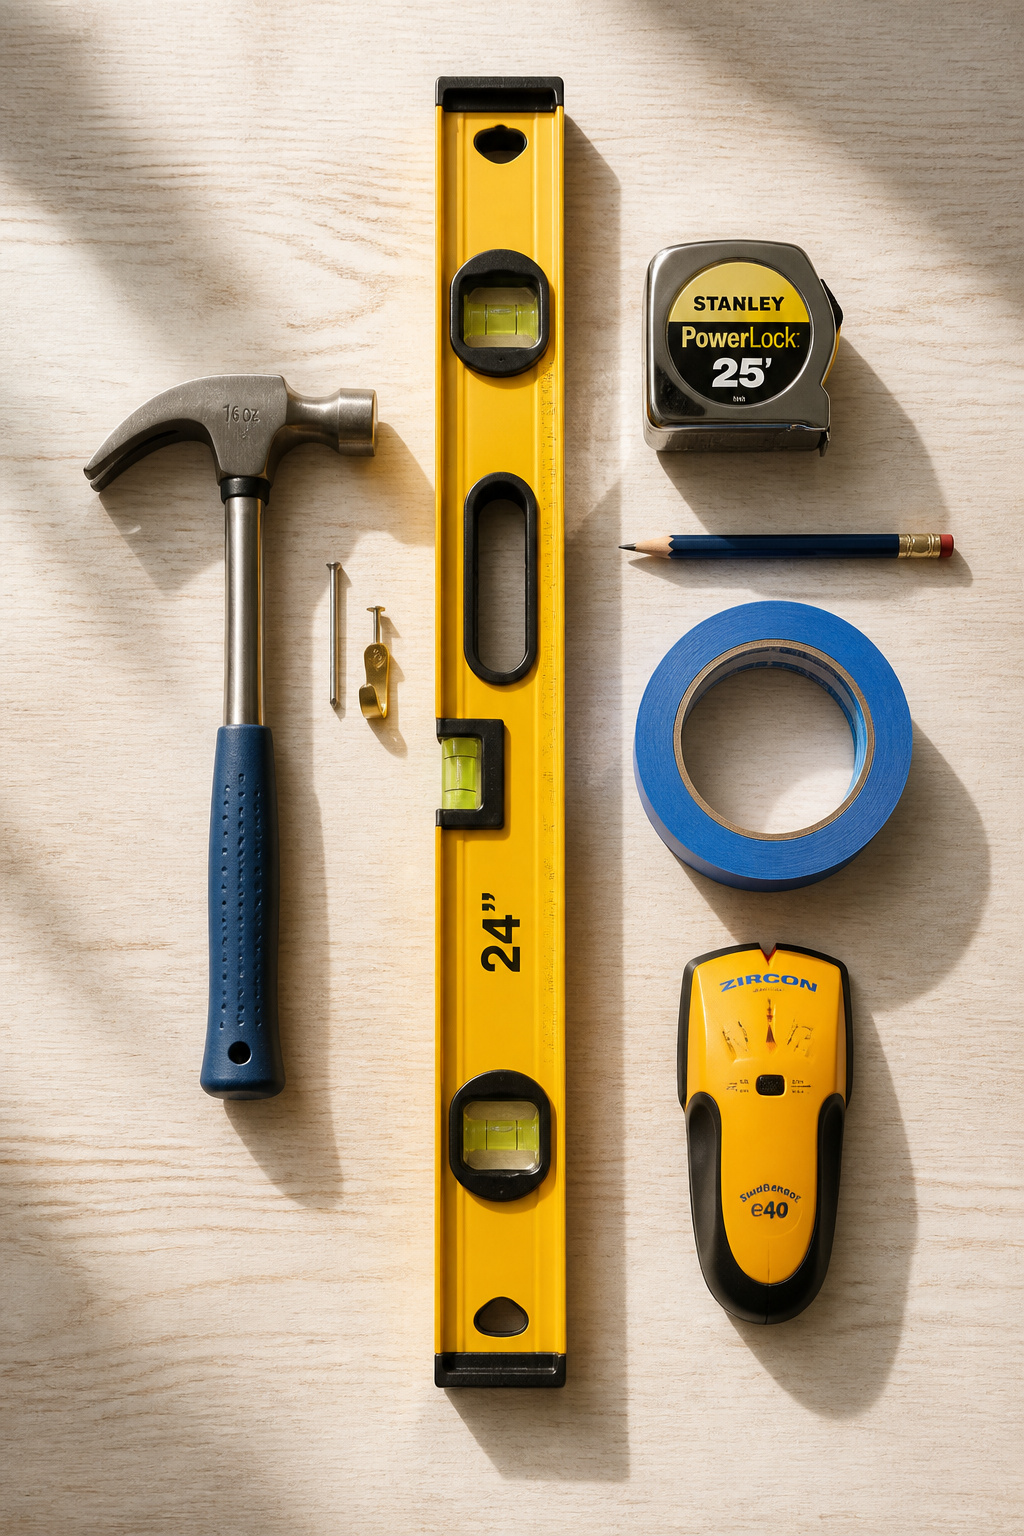
Nothing here is specialised: a hammer, tape measure, pencil, 24-inch spirit level, painter’s tape, and kraft paper — under $50 at any hardware store from zero, and the spirit level is the one worth spending on. A stud finder is optional under 20 lb (a budget Zircon StudSensor HD35 runs about $17), and your phone counts too: the iPhone’s Measure app has a level tool accurate to about a degree, plenty for picture frames.
Skill level rating and what ‘first build’ complexity actually means here
I rate this a first build. The hardest skills are reading a tape measure and driving a nail at a marked point — no power tools, no carpentry, under 20 lb. The risk isn’t structural, it’s cosmetic; as The DIY Playbook puts it, “If you make a mistake and want to move it, it’s only a hole. Patch the drywall and move on.” A mixed, non-symmetrical arrangement is also more forgiving than a strict grid, because small spacing variations read as intentional rather than as errors.
Step 1: The Floor Mockup — Compose Before You Commit
Before anything touches the wall, it goes on the floor — every wall I’ve hung that came out right started there.
Laying out all frames on the floor: why this step saves more time than it costs
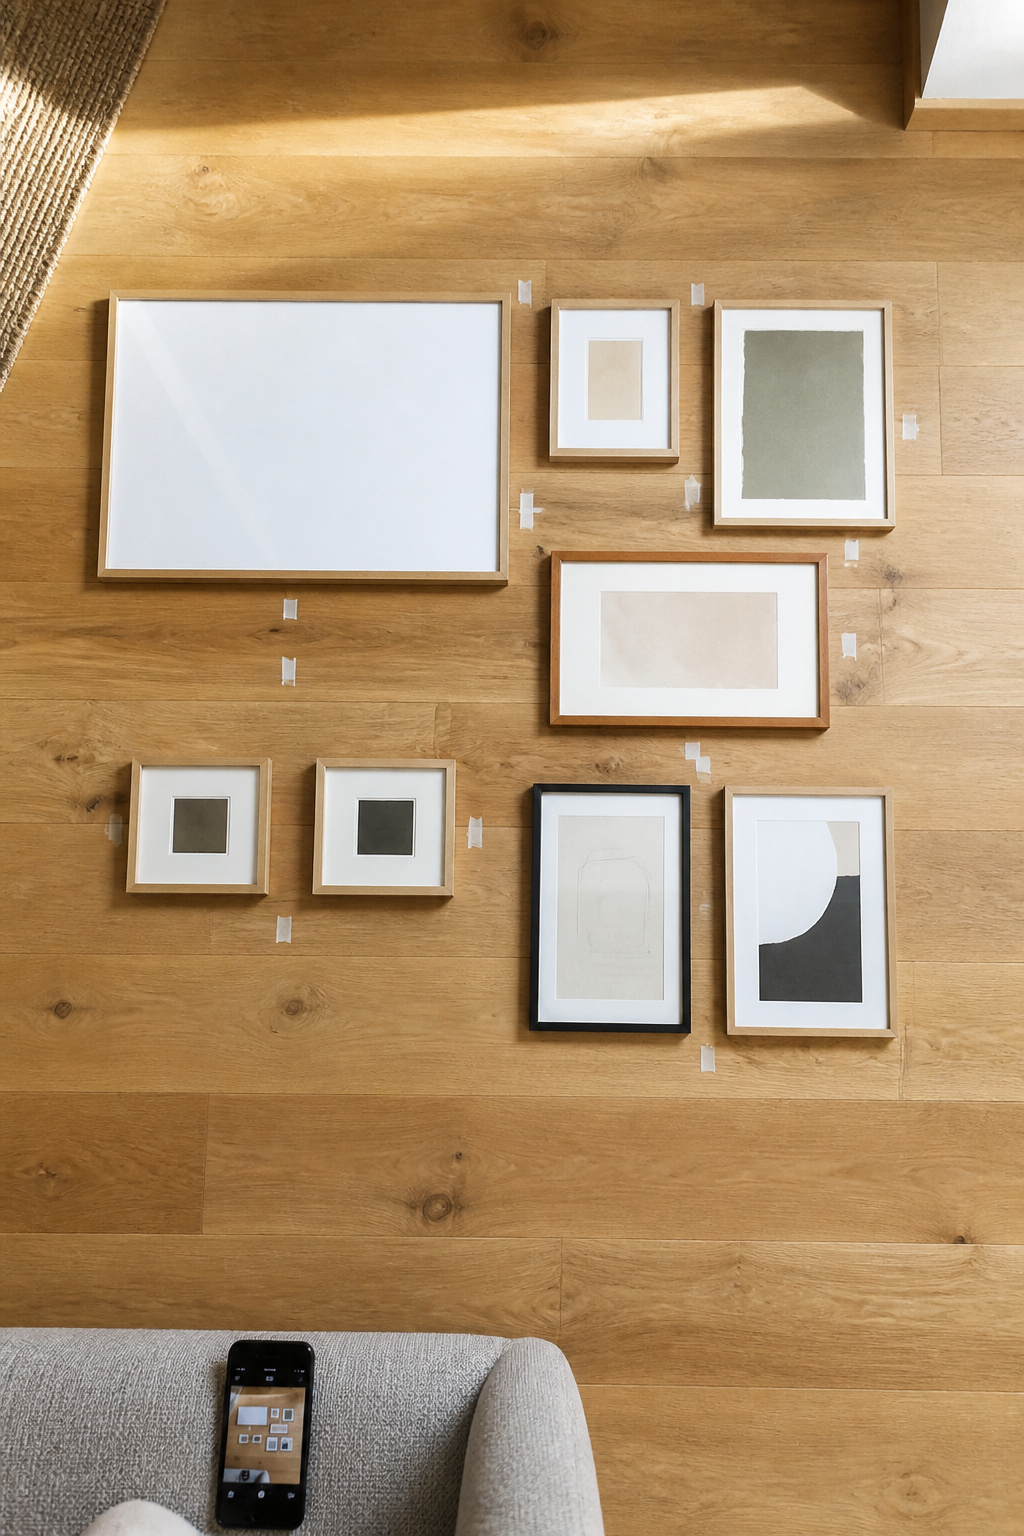
Clear a floor space the size of your intended wall area and lay the whole arrangement out there first — the single step that prevents most extra holes. Start with your hero, the largest piece, set it slightly off-centre, then build outward, mediums before smalls, placing the second-largest diagonally to balance the weight. Visual balance is far easier to judge on the floor than on the wall, and a mix of vertical and horizontal orientations keeps it from reading like a flat shelf.
Establishing the bounding box and the hero piece position
Here’s the concept that makes the rest easy — standard practice, not anyone’s trademarked method: picture the whole arrangement inside one invisible rectangle, the bounding box. The eye reads that rectangle as a single object, and its visual centre is what you’ll set at hanging height. The hero is your anchor; tighten every other gap to it, and nudge it slightly left of centre, since dead centre reads as rigid and off-centre as composed.
Photographing the floor arrangement: the one move that shows you what the wall will read as
Once the layout looks right, take a straight-down phone photo before you move a frame. It’s your reference if anything gets bumped — but the real trick is that the photo compresses the space the way distance will on the wall, so gaps that looked fine underfoot show up as too wide or too tight. Trust the photo over your standing-over-it eye.
Step 2: Paper Templates and the Wall Transfer
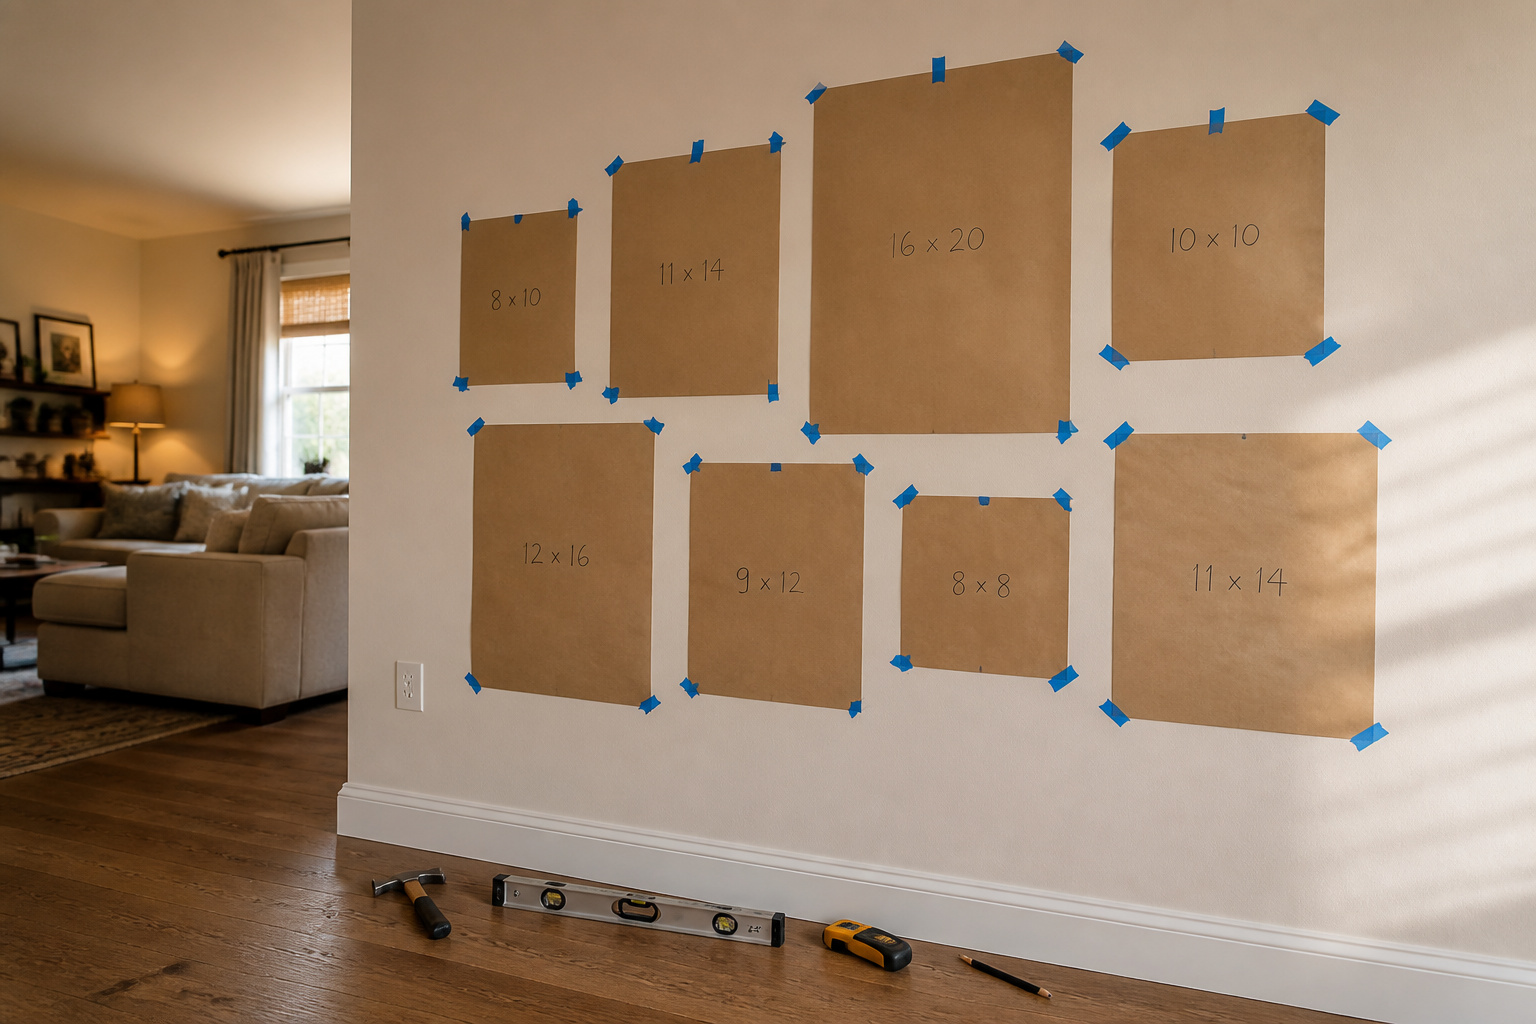
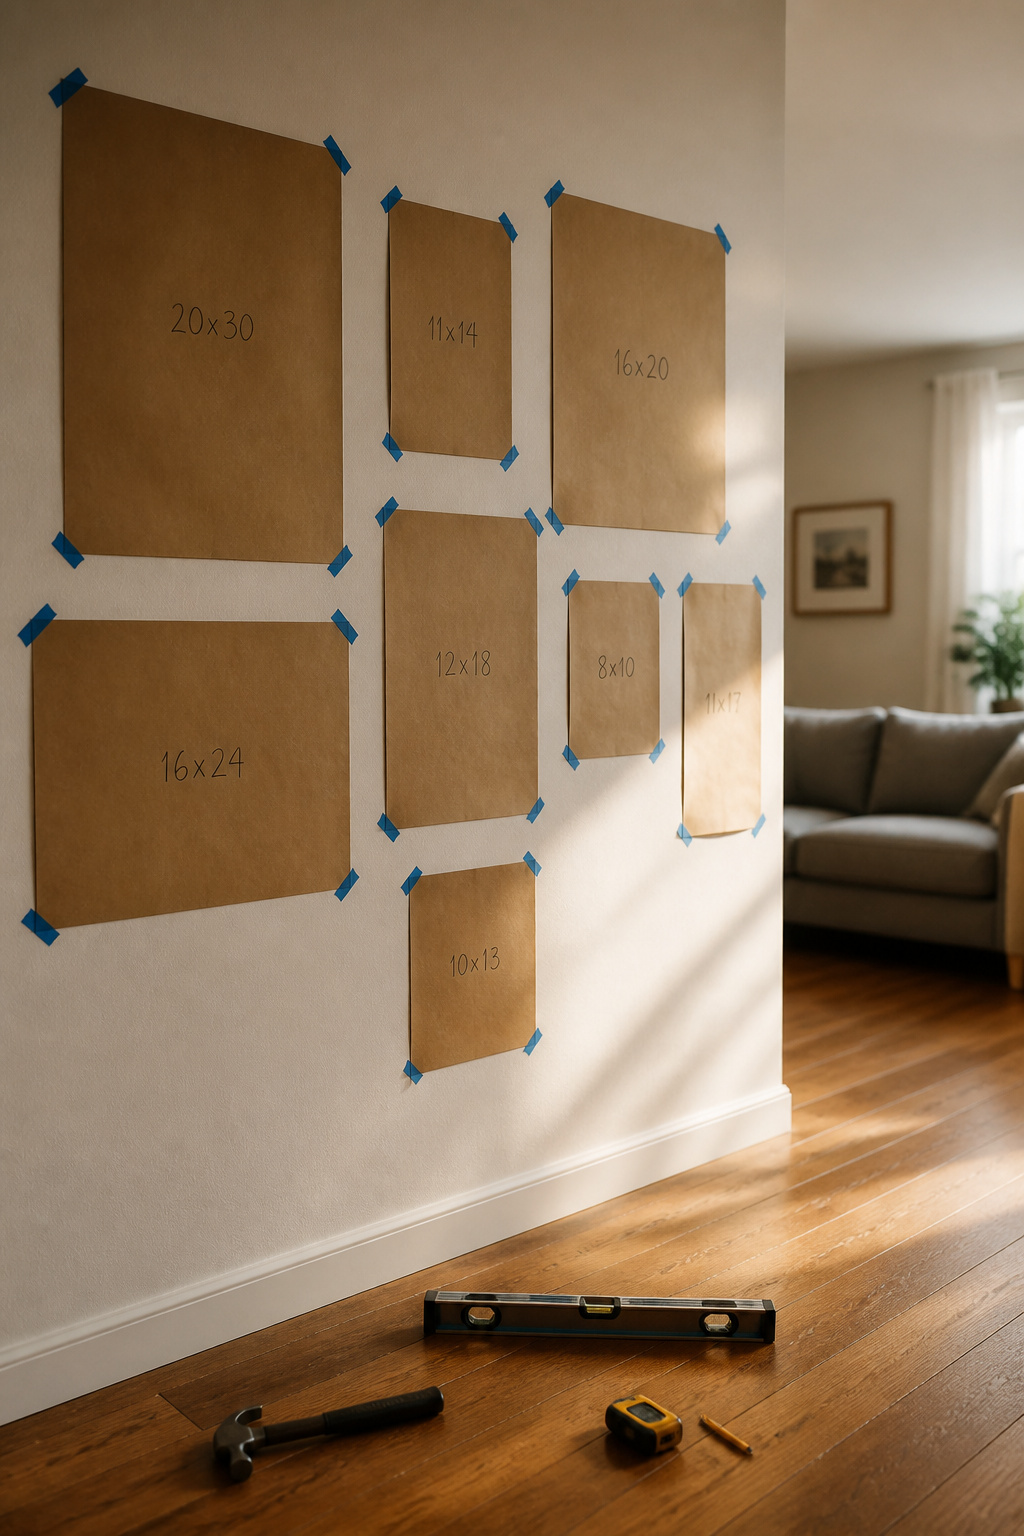
Paper templates move the floor layout onto the wall without measurement errors — the method that cuts guesswork at the point where most extra holes get made.
Tracing each frame onto kraft paper and marking the hanging point
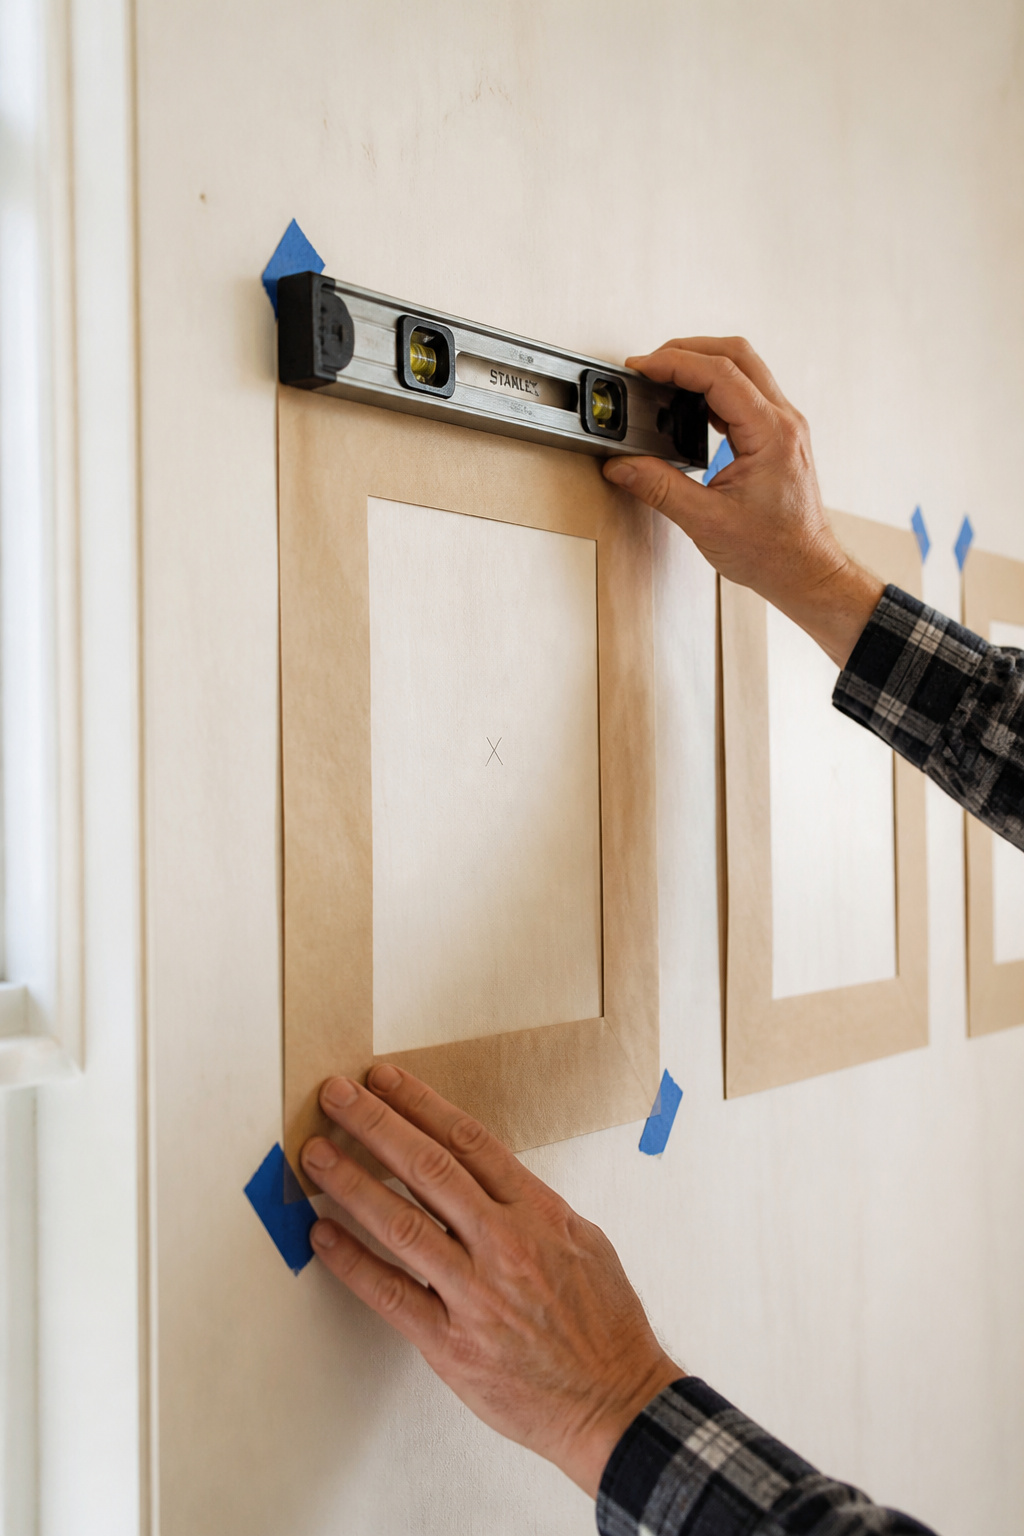
Lay kraft paper flat, set each frame face-down, trace the outline, label it, and cut along the line exactly — cut even half an inch inside and you’ve introduced spacing errors before you start. Then turn the frame over for the nail point: measure from the top of the frame to the hardware, and if it’s a wire, pull it taut first, because a sagging wire is the number-one reason a hook lands an inch or two off. Mark that distance down from the top and put an X on it — that, as Young House Love stresses, is the part the whole job hinges on.
Taping templates to the wall and adjusting before committing
Tape each template up with painter’s tape at the corners, reproducing the floor layout inside your bounding box, and rest a small level on each to confirm it’s horizontal. Then step back to the doorway and look from where people will actually see it. Adjust freely; the tape forgives, the nail doesn’t. Leave the templates up at least 30 minutes if you can — paper on a wall, seen fresh, tells you things the floor never did.
The spacing check: 2–3 inches between frames, how to measure it off the paper
The standard gallery wall spacing is 2–3 inches between frames — tight enough that separate pieces read as one grouping instead of objects floating on the wall. Apartment Therapy gives a wider 3–6 inches but notes that past about 4 inches frames lose their relationship, so 2–3 is the sweet spot. Don’t eyeball it: cut a scrap of card to 2.5 inches and set every gap with it, because uniform gaps read as designed while one odd gap reads as a mistake.
Mistake paragraph: the template that slips and the fix
Use masking tape and you’ll pull paint off on removal — its adhesive is too aggressive. Low-tack painter’s tape (3M ScotchBlue or any blue) sits on a painted wall up to 14 days without lifting paint. The other failure is the template that slips as you nail through it: press a finger on the X to hold the paper, start the nail at an angle, then bring it vertical once the tip bites. If one shifts while you’re driving, pull the nail and re-mark — that’s the single biggest source of an off-position hole.
Step 3: Hardware Selection by Frame Weight
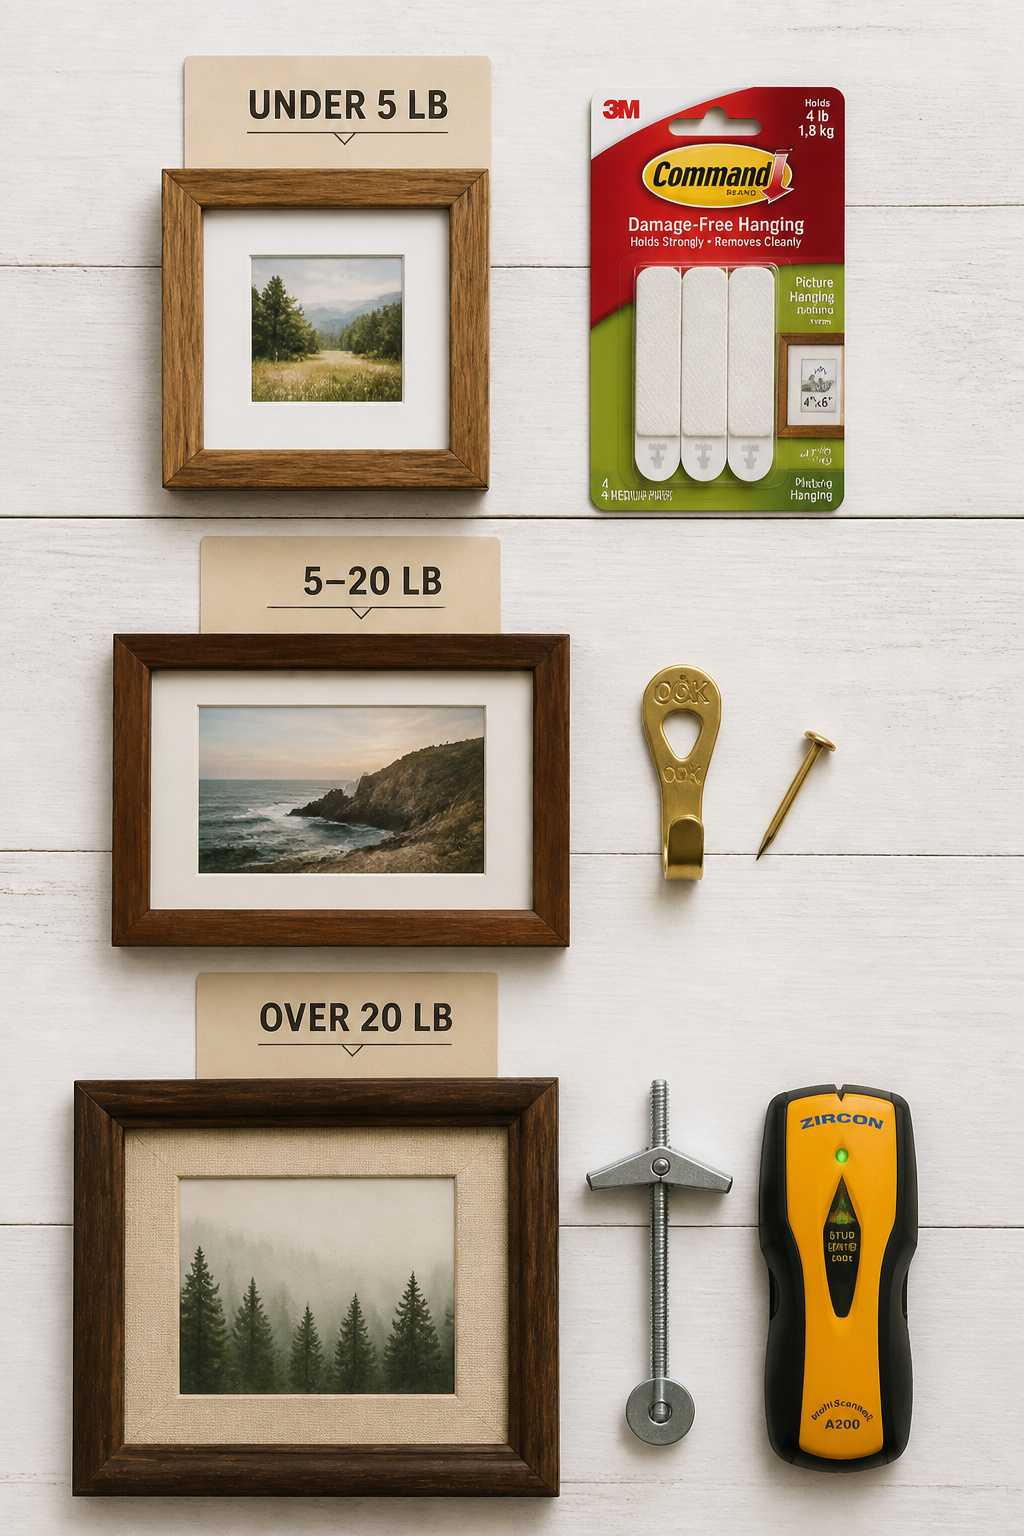
Hardware isn’t a preference, it’s a weight decision — once you know what a frame weighs, the right hook picks itself. So weigh each frame first: step on a bathroom scale with and without it.
Under 5 lb: picture hooks, adhesive strips, and when each is right
You’ve got two clean options. A standard OOK brass picture hook (rated 20 lb) leaves a hole smaller than a pencil point. Or 3M Command Picture Hanging Strips leave no hole at all, but only grip smooth, clean, painted drywall or tile; they fail on texture, wallpaper, and brick. Pick the hook for anything you’ll rarely move, the strips for frequently-swapped frames or surfaces you can’t drill — and for the no-hole approach across a whole wall, I cover the no-nail alternatives for renters in full elsewhere.
5–20 lb: standard picture hooks and wall anchors — the decision tree
For a 5–20 lb frame into drywall with no stud, a single OOK 20 lb professional hook does the job — its nail goes in at an angle, letting the drywall’s shear strength carry the load. One thing to burn into memory: OOK ratings don’t add up. Two 20 lb hooks side by side still hold 20 lb, not 40. If the frame needs to be rock-steady, step up to a plastic expansion anchor, good for 20–30 lb.
Over 20 lb: finding a stud or using a toggle bolt
Over 20 lb, find a stud — US framing puts them 16 inches apart (24 inches in some older homes), and a screw straight into one holds 100+ lb. No stud finder? Find an electrical outlet (they’re nailed to studs), measure 16 inches over, then tap: hollow means cavity, solid means stud. If there’s no stud where you need it, a toggle bolt is the strongest drywall-only option — a 1/8-inch holds about 30 lb, a 3/16-inch holds 50. The trade-off is the patch: remove a toggle and it drops inside the wall, leaving a quarter-inch hole that’s harder to fix than a pin hole.
Reading the hanging hardware on the frame back before buying anything
Flip the frame over first. You’ll find one of four hangers: a sawtooth (best under 10 lb), D-rings (on heavier pieces), picture wire (strung between D-rings), or a keyhole slot (takes a screw head). D-rings sit flat against the wall, while a sawtooth bumps the frame out a millimetre or two and can let it tilt — so on a mixed wall, D-ring frames hang straighter. Cheap frames often have cardboard tabs with no rating; a $3–$5 pack of stick-on D-rings fixes that.
Step 4: The Order of Operations — Hero First, Edges Last
The order matters as much as the marks: hero first, work outward, edges last.
Why you hang the hero piece first and work outward
Hang the largest piece first and build around it. Start from an edge instead and your small measurement errors compound the whole way across until the hero won’t fit where it should. The hero sets the register for everything else — hang the second-largest diagonally from it rather than right beside it, so the arrangement feels dynamic instead of stacked.
The 57-inch centre-height rule applied at the moment of hanging
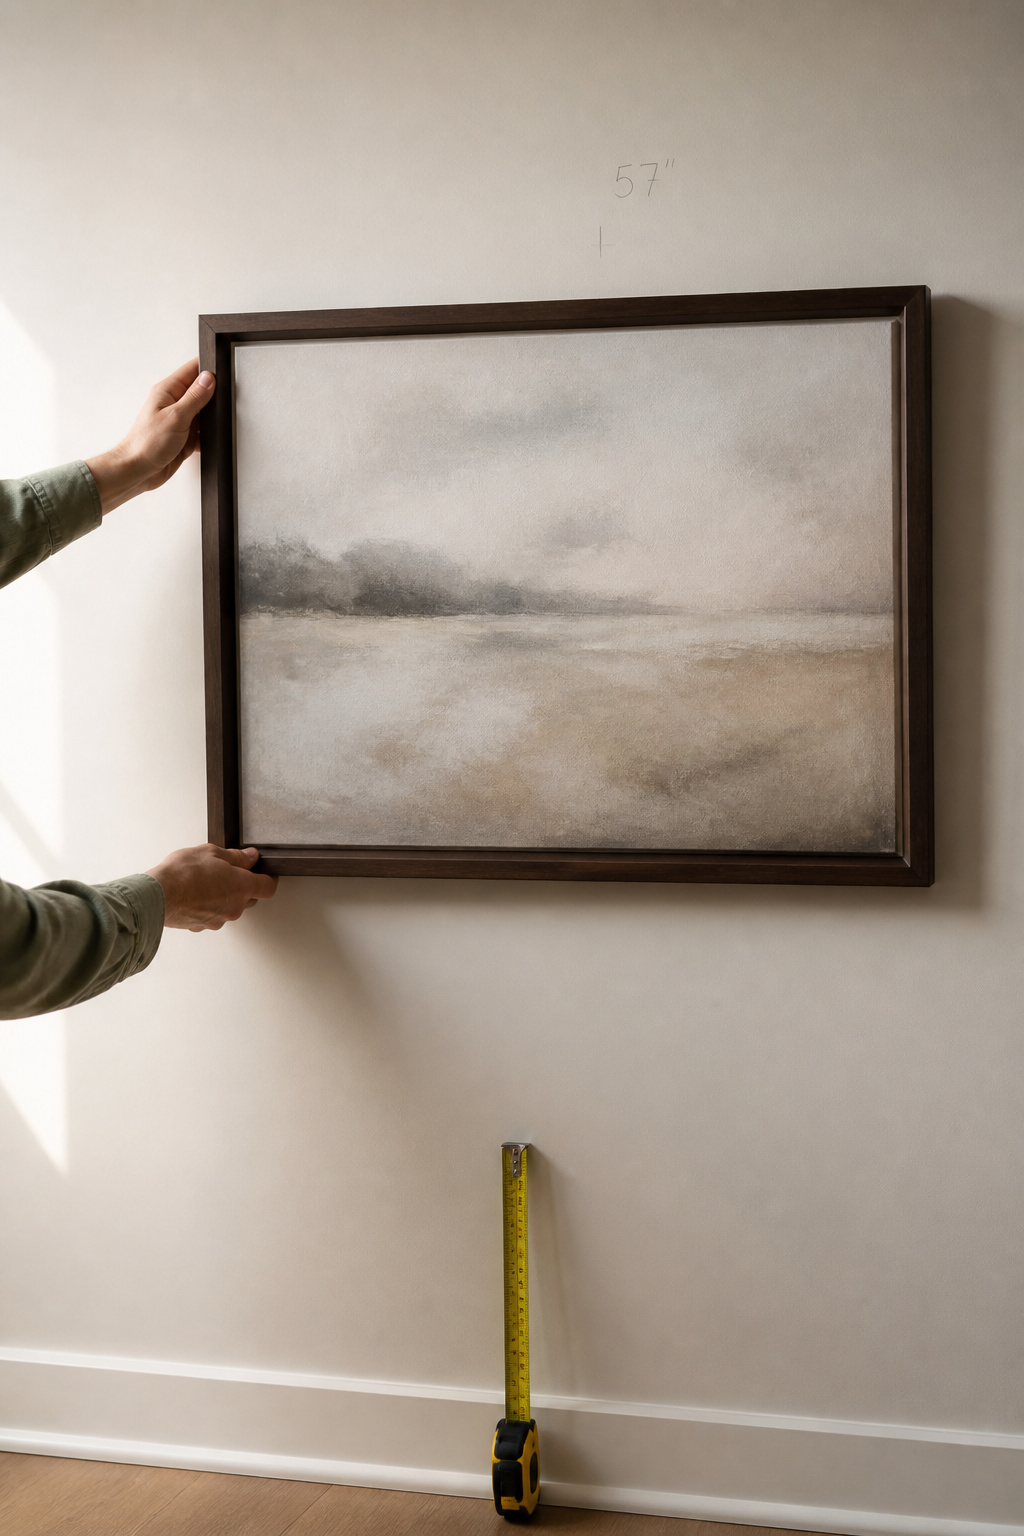
The 57-inch rule is the museum standard: the centre of the artwork sits about 57 inches off the floor, matching average standing eye level — as AS Hanging, who make professional hanging hardware, note, that’s “why art at that height feels immediately comfortable.” For a gallery wall, the 57 applies to the visual centre of the whole bounding box, not each frame, so measure it up, mark it lightly, and anchor the box’s mid-line there (push to 60 with 10-foot-plus ceilings). The one exception is a wall above furniture, where the relationship to the sofa overrides the rule — see proportions for art above a sofa for that.
Levelling each piece relative to the one before — the spirit level vs the phone app
Level each new frame against the one already hung, not against an imaginary horizontal: lay the spirit level across the top edges of both and adjust until they agree. A physical 24-inch level beats the phone because it spans two frames at once — on a ten-frame wall that’s 15–20 minutes saved. The phone app works fine too; hold it against the face of the frame for the truest read.
Step 5: The Final Check and the Holes You Can’t Avoid
Don’t call it done from two feet away. Step back to the doorway and check from a seated eye height of about 48 inches, the way most people will see this wall, and run three checks: level the whole bounding box with a long level across the top row (every frame can be level individually and the wall still slope); re-measure two or three sample gaps with your spacer; and confirm the height reads right.
Filling an extra hole honestly — spackle, dry time, and the touch-up you’ll need
I’ll say the quiet part out loud: plan on patching one or two holes. Most five-frame arrangements leave 1–3 repositioned holes, ten-frame ones 3–5. That’s not failure, that’s the job. Quick-dry lightweight spackle is sandable in about an hour; standard spackle wants 1–2 hours to dry and a full 24 to cure before paint. When you touch up, feather the brush stroke out past the patch rather than spotting the hole dead-on, so it blends.
What to do when a frame won’t sit level (it’s usually the wire, not the hook)
The most common after-the-fact gripe: a frame hangs level on the hook but tilts when you step back. Nine times out of ten it’s the wire — its contact point is sitting off the frame’s true balance point, so slide the wire along the hook until it settles straight. For sawtooth hangers, which rotate over time, add self-adhesive rubber bumpers to the bottom two back corners — $3–$8 a pack, just enough wall friction to stop the tilt.
So that’s the whole job, no guesswork left in it. If you do one thing today, clear a patch of floor and lay your frames out on it — composing on the floor before you commit to the wall is what turns a wall full of patch holes into one you’re glad you hung yourself.
FAQ
How far apart should frames be on a gallery wall?
The standard is 2–3 inches between frames — tight enough that the pieces read as one cohesive grouping rather than separate objects floating on the wall. Apartment Therapy gives a wider 3–6 inch range, but past 4 inches frames lose their relationship. Use a cardboard spacer cut to your target gap so spacing stays consistent throughout.
What height should the centre of a gallery wall be hung?
Hang the visual centre of the whole arrangement — the centre of its bounding box — at 57 inches from the floor, the museum standard that matches average standing eye level. In rooms with 10-foot-plus ceilings, 60 inches works. The exception is a wall above a sofa or console: there, keep the bottom row 6–10 inches above the furniture instead.
How do I keep gallery wall frames from tilting?
Stick self-adhesive rubber bumper pads to the bottom two back corners of each frame before hanging — $3–$8 a pack, and the wall friction stops them rotating on the hook. For wire-hung frames that tilt, slide the wire along the hook to find the true balance point. For sawtooth hangers, which rotate most, swap in stick-on D-rings that lie flat against the wall.